1972 Chevelle - 454 - Turbo 400 - 3:73
I started this journey back in 1987 when I purchased this car. At that point it was maintenance and simple tune and go.
Over the next couple years no real changes other than letting a roommate drive the car over a 3' concrete block wall. Another frame, few new bolts, new wheels and it was ready to go again.
Then in 1992 I spun a bearing so the 402 came out and a rebuilt low compression 454. This build I used TRW forged 2377F flat tops with 113cc chamber 781 heads. The block has less than 40K miles on it. I put a small 270* .515 lift summit cam in it. Ran a 2400 stall converter in my TH400 with 2.73 rear end.

In 2002 the company I worked for decided to change directions so I was paid to leave. I took a chunk of the severance money and purchased a complete sound proofing to headliner interior kit. PUI seat covers and door panels all from classicmuscle.com
I pulled the interior out in the single car garage. When I removed the interior I found rust under the back seat. I ordered a new floor panel from www.ss396.com. Picked up a Craftsman welder and went to town. I of course really didn't know what I was doing but its solid again. I recovered the seats.
I tore the rear end apart and used an Eaton Posi unit with 3.73 gears to liven it up a little.
I also stopped in a local machine shop to inquire about shaving my 781 heads to bump my compression up. He happened to have a set 702 396 heads with 98cc chambers on them. We worked out a deal he tanked them, installed brass guides, bigger valves and I cleaned up the runners and bowls on them to increase flow. He skimmed them to make sure they were clean and ready to go. With the use a steel shim head gasket I am going to bump my compression up to 9.3 and my quench area will be right at .40. Should make for some fun with a bigger cam.

Now if I can ever find time away from the golf course to work on my car I can start putting the new stuff in.


 Here I created a new cage for the outer bumper bracket install. The funny thing is there was rust flash on the piece of metal so it looks like it's been there a long time. I will take some more pictures and post.


The 702 head I have on the engine need the intake face resurfaced as the angle is off and I believe it is causing issues. Got a great deal on clean take off loaded heads with stock valve size and CC 930-16 springs. So I wont have to tear these apart to swap out springs. I plan to take the 702 heads to a local shop the fix the angle and reinstall later. They are pocket ported with larger valves for better flow. I picked up a Victor Jr intake from same seller for cheap as well.


So I ordered Speed Pro E-233K rings, Mr. Gasket 1131G shim gaskets, Summit 1 piece oil pan, Fel-pro cam change kit and Fel-pro valve cover gaskets. I picked up Holly Track Series 241-281 black fabricated valve covers, Summit 1.7 stainless roller rockers to replace my older Lunati aluminum ones.


Things to do. I have to order a black valve cover breather for the passenger side along with 2 grommets. I have to figure out new spark plug retainers as the factory Gen 5/6 looms need a clear lip not the cutout spaces. I have to install the new brake warning connector for the PV4 block. Bleed the brake system, again. Install water pump, alternator, power steering pump, AC Compressor and radiator. Add oil and antifreeze / water and go drive.
Friday night after work I installed spark plugs, wires and filled radiator with distilled water.

So today I spent most of the Saturday resting. I pinched a nerve in my back last weekend turning soil for our garden. I did do a couple of things. Hooked exhaust back up to headers. I unhooked the ECU and then hooked up my battery. I have to install my o2 sensor and will be ready to fire my engine. I am looking to get the engine warmed up. Then plan to let it cool down and then retorque the heads.


And on top of having to round the inlet and outlet, the core itself was slightly twisted. A few minutes with some pliers and the aluminum tubing was rounded into a workable shape. I little gentle twisting and it appears to be fairly straight or good enough for the girls I run with. I will swap this in when I can physically get back after it again. Hopefully this weeks chiro visit fixes me again.
Here are pictures of items
I worked on in 2002 / 2003.
 |
| New floor pan under rear seat. |
 |
| Cleaned up original '72 Dash |
 |
| Re-Chromed Bumpers |
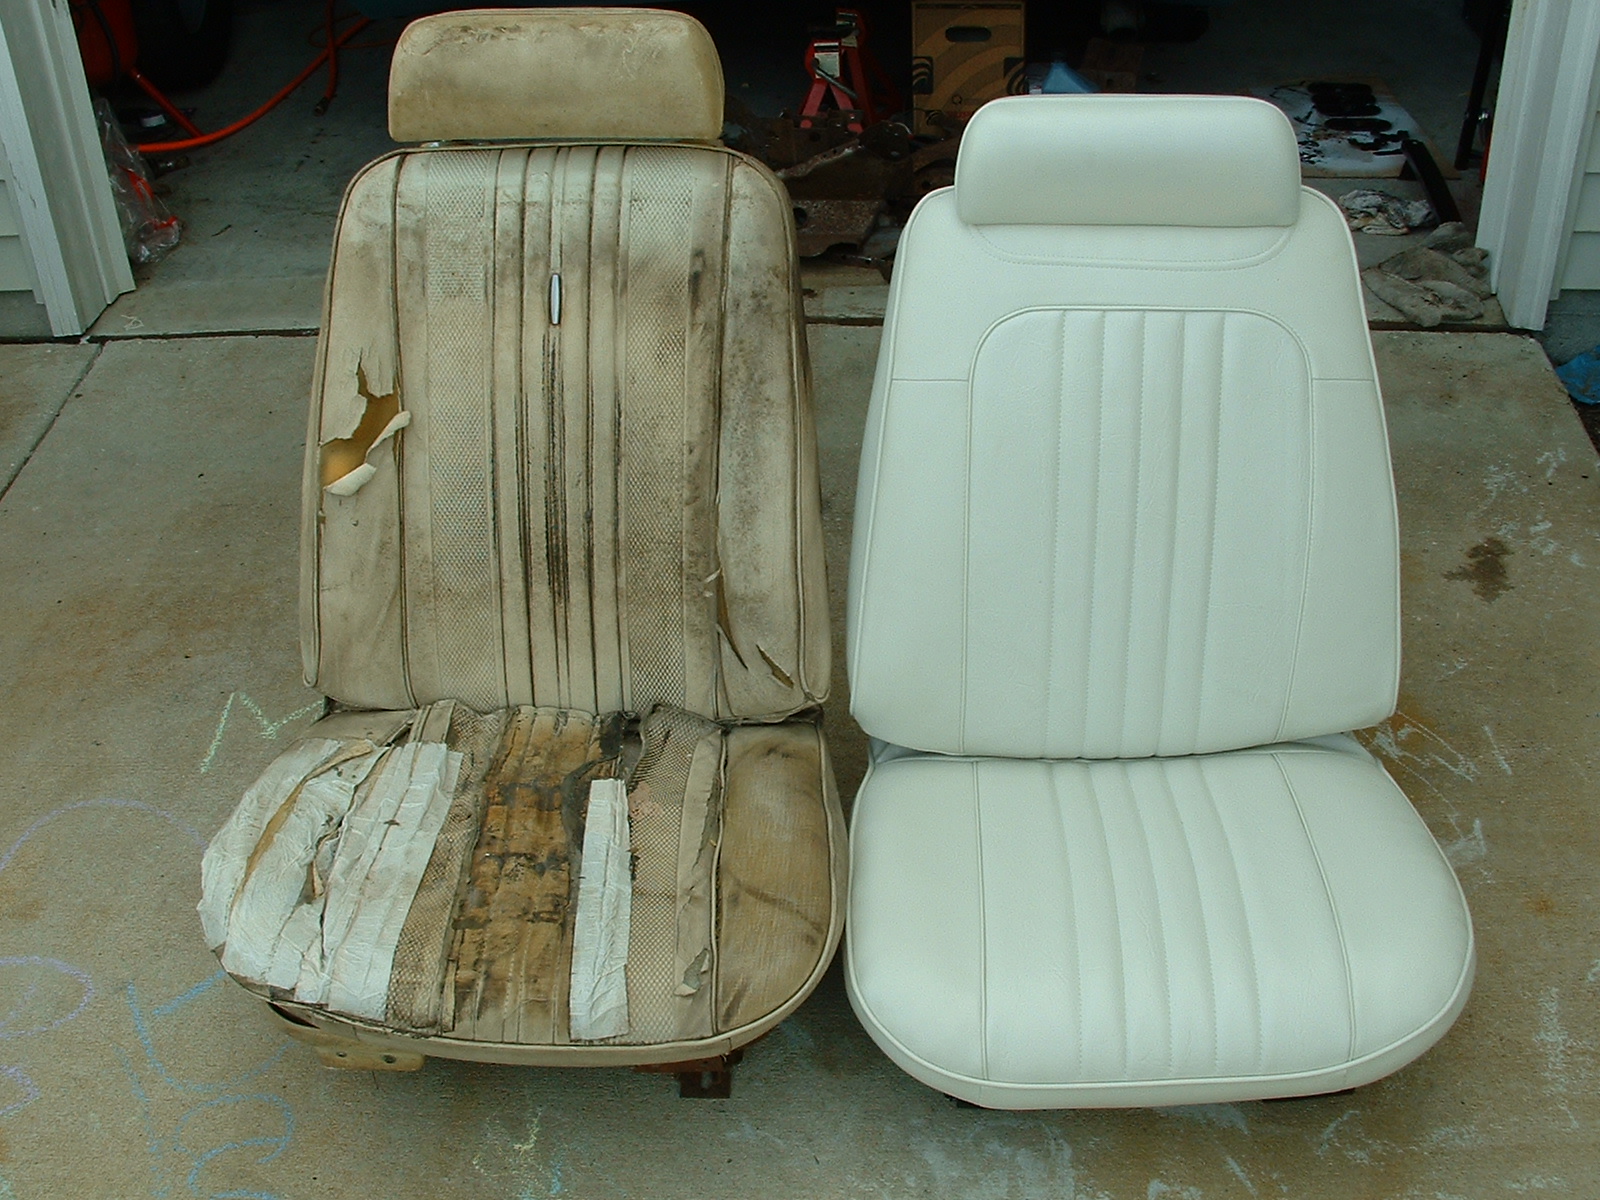 |
| Recovered seat versus original |
In 2004 we moved to a new home. This one is in a golfing
community so my time / energy was diverted to learning the frustration that is
golf. My daughter started playing sports and really took to swimming and
joined the local swim team. They competed every summer. She was
consistently placing in the top 10 in the city championship meets. I of
course had her at the driving range and on the golf course saying your going to
be a golfer. :) Now its 2014 and I realized she is going to be
driving at the end of the year. I have to get back to work and get this
going.
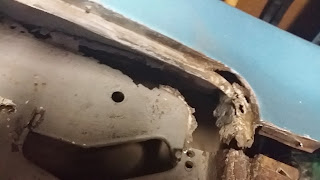
In 2013 I took out the back window and saw a mess. I then
cut away the panel between the window and the trunk wow! Ordered AMD
replacement parts from NPD. I also found with the rear package tray to
trunk if you got just the top center piece it was less than $200, if you got
the entire package tray with side supports and back seat support it was $500.
I am creating with the use of simple hand tools and welder new side
supports. I am going to cover it all in peel n seal for sound proofing.
Now if I can ever find time away from the golf course to work on my car I can start putting the new stuff in.

This exploration was done in December 2013.

I was looking at trying to save the panel from the package tray to the trunk. There just wasn't enough metal from the bottom corners of the window channel to the center section.
I am at a point of no return, damn the torpedo's full speed ahead.
Feb 2015


So I cut it out to get after it and clean this area up.


After doing some research online. I was able to either get an entire new trunk divider package tray complete or just the center section. I opted for the just the center and will fabricate new side supports.
March 2015


July 2015
I also had holes in the window channel around the back window.

Here is first weld up of sheet metal to cover large rusted area.


This one shows more patching along the top and bottom corner. I still need to patch along the sides.
Test fitting new panel onto fabricated side supports.


Panel fits pretty well. I need to tweak the angles on the back of the supports other than that seems to line up pretty good.
Fun but tiring weekend.
September 2015
Ok been working diligently an hour or two to get the patches around the back window done.
I still have to clean up the bottom corners but its metal all the way around the window now!


As you can see here I have started cutting out the trunk panels to replace. I have purchased from www.classicmuscle.com a two piece trunk pan. I plan to replace the outside braces as the passenger side is rough at the top near the wheel well. The drivers side looks to be in good shape. I will use filler to clean the lines up around the window. The bottom part of the channel is solid metal all around and will not have any filler. I will use Rustoleum gray to coat the back side on the sides and bottom once I complete the trunk work.

My wife told me today that if I had put the same effort in that I have over the last two weeks this one be back on the road already. Thanks Hon! LOL


Here, I am test fitting the two sections of the trunk panel I am replacing. I am needing the two outside trunk braces. I have to massage the corners that butt up against the wheel wells.
Score!
I happen to find a really good deal on a set of real metal solid flat tappet lifters.

Now plan is to get new cam. Playing with different custom grind options.
October 2015
I spent all of Sunday in the garage doing some final cleanup and welding in preparation for final install of the trunk pans.

More clean up and prep for final trunk pan install.

This shows a small area that I cut out and replaced with clean piece of metal.

Test fitting again before drilling holes for welding to support brackets

Shows the patch installed.

POR 15 on the back cross brace. I will use Rustoleum gray on the entire trunk area after I have completed the welding and seam sealing.

This shows I was getting tired and drilled 3 holes to nowhere. Easy fix but I knew it was time to call it a night.
Good day on the 10th got the panels welded in.


Now just install the rear window panels.
Fitting the trunk divider panel.


Last weekend of the month. Got a bunch more done.


Tunk lid is on! Need to verify measurements to make sure its all square and level. I still need to get it aligned. Really excited to be at this point where it looks like a car again.
I have begun to tear the engine down to clean it up and install the new updated heads. I am figuring I should be able to get the motor started before the new year!
November 2015
Here are some shots I took after I cleaned the front of the motor and sprayed paint to make sure the color on the new heads match. I have also paint the GMPP aluminum valve covers Chevy orange.


Now, I have to clean up the pulleys get them a fresh coat of black paint and get the gaskets on here to fire her up.
Drained the oil put some Marvel Mystery oil and clean oil, cleaned the lifters and oiled them up. Marked them to verify lifter spinning in bores. Checking valve to piston clearance and them will install new gaskets to fire her up. Last time she ran was 2003.

I took the rear end out of the car. Cleaned off the grease and oil painted it a fresh coat of Black Chassis paint. Put new bushing in it. Filled it with oil and reinstalled. I then suddenly can't remember if I torqued the axle bearings. *Update* I didn't had to siphon out the gear oil and posi fluid to pull the cover and torque to spec.
I have also installed a CPP rear disc break kit from Summit to replace the old drums.
I have cleaned up the underneath of the trunk pan and painted it with POR-15 also.
I have the new gas tank ready to install once I finish the rear end again.
Putting the top end on the motor to get her fired up either before or on my birthday.


OK, motor almost ready. I need to get PVC breather and finish vacuum lines. I siphoned rear end and torqued axle caps in rear end. Now I need to get gauges hooked up and fluids topped off to get it fired up.
Been busy working and haven't taken many photos. Will post new work.
August 2016
Got rear seat recovered and is installed. Got the carpet in place.
My wife purchased a Vintage Air under dash A/C system for my birthday WOOT!
I have now started installing it.
September 2016
Cleaned up my EBAY find 1998 Jeep GC steering box and installed it.
Picked up a new metric power steering pump and pulley and installed it.
Cleaned up modified a 1995 Astro Hydroboost and installed. Now I need to get the lines tweaked and installed.
Installed new KYB shocks on the front. Need to do rotors, pads and flexible brake lines front and rear center.


October 2016
Here I am working on the back window area. I have coated the entire area with fiberglass. I will be sanding and getting some short strand filler to smooth it out.


Have installed battery and headlights, horn, AC work. I have temp and oil warning lightings working and nothing else. I have a new printed circuit to install to get more dash working.
Turns out not an issue with the old printed circuit. Had an 8 terminal light switch and needed 7. Dash lights mostly work except for some chinese junk socket holders that don't fit. I am ordering about 4 more GM ones to complete the dash lighting. I am also throwing the idea around to change the 6 to 8 center lamps to LED to try and brighten up the gauges.
I also installed a Shiftworks Tach S514-W in the space where the factory clock was in the dash.
November 2016


I have test fit the window. Looks like it is going to fit without falling through into the passenger compartment. :)
Now I need to get the studs installed and get some paint on it.
I checked the oil level - good and then started adding anti-freeze and water. Ran into an issue. The freeze plugs had rusted in the time the motor sat waiting for me to get back to her again. Damn one small step forward and three big steps back.
December 2016
Pulled battery, radiator alternator, water pump, power steering now need to clear the back of the engine off and unbolt the transmission to prepare to pull the motor.
I borrowed an engine hoist for a fellow motor head that lives a couple of blocks away. Picked up an engine stand from Harbor Freight. I am going to install a bigger hydraulic cam shaft while she is out. I have a Elgin E-1797 which is a .228 duration @.50 and .550 lift. I have a Holeshot 3600 I was thinking of using with the solid cam but I think it will be a little higher than I need. I think with this cam, a 3000 stall would probably be right on the mark. I might sell this one and get an replacement to better match the combo. I am going to leave the 2400 stall in with the 3:73 rear.
Want to try to finish this by New Years break.
January 2017
Got a bunch of work done. I picked up brass freeze plugs locally. Took the old ones out cleaned some nasty crap out of the block and installed them. I picked up POR-15 Chevy orange paint from Summit along with a new fuel pump. I used paint stripper on the oil pan and a wire wheel on the block. I have put one coat on the pan and block. I grabbed some new main and connecting rod bearings while the motor was out and I installed them. Put in my Elgin cam and Cloyes Roller timing chain set. I purchase at the same time a new AMD battery tray, ARP waterneck fasteners '74 water outlet neck with provisions for temp sender to replace my old one that is starting to look a little sketchy.

Found a stress crack on the back of the engine crossmember where it mounts to the frame rail. I removed the passenger side suspension and used .30 flux core wire to weld both sides of the frame. I didn't take any pictures before but it was a tiny line. The only reason I saw it was I was getting ready to change the shock out and saw the split in the spring pocket. I will take a picture of the finished area.


Worked on cleaning up the frame and painted it semigloss black. Cleaned up the front brake lines ane painted them silver. Picked up some tubular A arms. I got some Proforged 1/2" long upper ball joints and Moog lower ball joints which didn't want to seat all the way in. Spent most of my Saturday screwing with them. I am going to order Proforged lower to see if I can seat them easier. May also end up with a shop press at the house as well to complete this task.

Feburary 2017
Ok after spending over a week trying to get the flat tappets to spin I changed directions. Pulled the Elgin cam and lifters out. I have a Howards Cam's hydraulic retro roller cam, lifters, and pushrods to install so I can put the motor back where she belongs.
I used a discount coupon and found a $50 gift card that I forgot about. Took it to Harbor Freight and purchased a 12 ton shop press. Finished pressing the Moog lowers completely in. The passenger side lower control arm fit like a glove. The drivers side need a little persuading to get it in the mounts. I have cleaned the spindles and brakes. Painted backing plates silver and spindles cast iron and calipers are grey. I refurbished a few wires that run to the alternator and changed out the melted fused link to starter while I had plenty of space.


March 2017
Got my front suspension complete. I picked up AC Delco front rotors from Amazon for 28.00 each. Picked up new bearings and installed them. Purchased locally some new semi-metallic brake pads. Cleaned and painted my calipers. New flex hoses and banjo bolts from NAPA. Reinstalled my motor.


40 year old rotor

New rotor and pads. Need new non-dented dust cap.


Ordered new radiator fan shroud from Classic Muscle to complete the front end and will be able to finish the AC install as well. I found out I installed the flexplate backwards on the engine. I fortunately had planned to put a new transmission mount in and clean up the transmission so just a little more work. Hoping to knock this out this week / weekend. While I am under the back of the car I need to install the new rear flex hose on back of car. I will then be able to put brake fluid in car and begin to bleed brakes. While I am doing that I will put all new rubber hoses on the fuel tank.
I unbolted the transmission from motor and installed 4" long bolts on bottom of engine / transmission to give a guide to move transmission back. I used bolts and washer in case I need to draw them back together again later. Got under the car and removed the trans cooler lines by unhooking from radiator and transmission. The slid underneath the motor and then out the drivers side easy. To move the starter out of the way I unbolted the outside bolt and loosened the inside bolt. It swivels away from the flex plate and front of transmission so I will not need to take off my car. I have unhooked the rear u-joint and placed drive shaft on wheel dolly to move freely when I unbolt the transmission mount. I then removed the shift linkage and speedometer from drivers side of transmission. I then got out the purple stuff and scrub brush to clean rear of transmission up. Called it a night and back at tomorrow after I get home.
Tonight I unbolted the transmission mount. I then took a piece of 3/4 plywood and placed under the transmission's pan used a floor jack from each side of the car. One on the front of pan and one under the rear. I then jacked up the transmission off of the mount and slid it about 3 inches back. Plenty of room to remove the flex plate bolts. I removed four and then rotated the motor to get the last two. I was fortunate that the dowel pin was on opposite side of last two bolts to help control the flex plate. I then flipped and reinstalled. I then slid the transmission back to the rear of the engine. I called it a night as I didn't have the new transmission mount yet and the wife wanted me to help with dinner.
This goof up being much easier to remedy than I initially thought it was going to be.
Motor back in buttoned up timing fairly close, hose from 5 gallon gas tank to fuel pump. Check. No fire and gas leaks. So after messing with fuel lines getting the carb to stop puking fuel. Still no fire. I took out the distributor and cleaned contacts put back in. Still no spark. I then got the meter out and found out that the position sensor assembly in distributor is shot. Pulled back out disassembled and ordered new parts. I also hit up Amazon a new chineseium unit to fire off Sunday. I put new shoes on the front. I went with 225 60 15 to match my 275 50 15 drag radials out back.
April 2017
My new distributor showed up after a neighbor brought it over because post office delivered to wrong house. Car fired right up. A couple of back fires and gun shot sounds in exhaust let me know something was not completely right. A couple of wires in wrong place, fixed that and she runs good.
Idle is set to about 800 and timing is about 14 initial. I haven't changed anything on the distributor as I am going to use the older one after I get it rebuilt. It has rev-limiter in the module.
April 5th
Milestone today! I put about 7 gallons of gas in tank. Drove the car out of the garage. I need to bleed and add more power steering fluid. The brakes need more work but that maybe due to really low power steering fluid.
WooooHooooo!
Check list of needed items is shortening.
Things I still need to pick up
#1 - 3 Point retractable seat belts for the front.
#2 Outside window felts. Repops Ch183A
#3 - Alignment
#4 - Paint
Replace exhaust with mandrel bends versus local shop that used a squeeze bending machine.
Items to Install
Complete wire harness to console install.
Complete dash lights and get all idiots lights to work.
Rear wire harness - LED's in tail lights
Headlights
Bumpers
Door panels and seat backs
Windlace around windows
Headliner
Seatbelts
Hybrid Logo's on front fenders
Items to remove
SS
454
from front fenders.
After I change my car to a hybrid I wonder if it will fit into the parking spaces. LOL
April 7th

Sems vinyl dye seat pieces

This shows how I replaced the broken stud with 1/4" threaded rod.
cut off broken piece and the flattened the base. used very small drill bit up to the correct size to drill hole to tap.


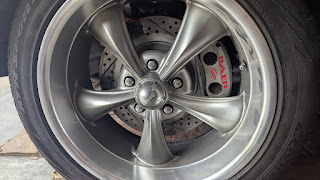
Used what was recommended to me for color on the wheels. I think I am going to pull the bright work off the wheel and paint with VHT cast iron color this one looks wrong.
Here is better video.
I have a bearing up front making noise. I am pretty sure it is the fan clutch.
Turns out the fan clutch just needed some grease. I am now looking at the alternator making noise. I think the bearing is a little dry. I have ordered a replacement and will get it on Wednesday. Gives me time to repaint the top bracket again. I also need to install hose brackets for the heater and AC lines.
Back window has been glued in. Had my daughter help we did a couple of practice runs of installing the glass. Cleaned with rubbing alcohol and use 3M primer and 3M Urethane window glue. Ran into two issues for my first time installing. One was not enough gloves so now my hands are a nice urethane color. The other is that I forgot to use a dam and have to clean the interior with extra glue. Doh! Will test fit trim tomorrow as it is time to get an adult soda and throw some burgers on the grill.

Cleaned up seat belts for the back seat. I am ordering retractable 3 point belts from Wesco for the front. Installed new horn relay as the original's bracket was broken.
I have also been working on cleaning the interior door shells. The passenger was poorly replaced by previous owner. I am going to have to run down a replacement in the future. I have removed all the AC misc vent parts in the cowl. I am going to clean that up and install covers. I ordered outside factory style window felts Repops CH183A and torque converter dust cover from Speedway. I ordered Teal Green Metalic paint from paintforcars.com. I am going to finish up the small amount of chip and dent work give the car a good sanding tape it and spray it. That way it will all be one color again.
Happy Easter 2017
Spent the weekend working on the interior. Need to get a couple of small items I can't locate in any boxes. Fought the glove box lock not working. It was just really tight so I sanded down the slot where the catch falls and it seemed to help. Waiting on a ground strap from headlight switch to wiper switch to ground to see if that is the issue with warning lights. Got my seat belts installed. It was frustrating because I had the bag of seat belt bolts in my hand and then I couldn't find them. I had somehow put them under the drivers seat. In these photo's I don't have the bottom seat locked or the window crank holes punched through.


April 18
Worked on grounds and lamps for the dash. I have all the back lights working but my TEMP light is intermittent and my GEN and OIL lights are not lighting up at all. I do need to clean and ground the rear lamp harness to complete the grounds. Then I will have to chase things down in the engine compartment. I installed the latch bar for the glove box door. Thought I was going to have to order a replacement but got lucky and found it in a box while I was looking for other pieces. I took the dash pad off the shelf and set it down on top of the dash to give it a more finished look. I have an old head unit that fits the dash I will install to fill the hole. I plan on using Bluetooth to amp for modern tunes.
April 19
Fixed ground connector on rear light harness and installed front turning and running light. Now the dash lights work, the turning signals work and my temp, oil and gen lights still don't. I will check connections under the hood and make sure they are good.
Still need to put the car back up on stands and work the brake issue out. Finish small putty work on dings and sand for paint. Getting so much closer.
Spent last night with flash lights, fluke and jumper wires trying to get my Gen, Oil and Temp lights to light up at start up. I am beginning to wonder if my column wiring is different than the harness wiring. I am going to have to spend more time chasing. Friday after work I am going to put her up on stands and pull the wheels to work on getting brakes working. Going to try to get sanded and primed where needed in prep for paint.
May 2017
Ok, been working and not updating. Picked up new billet brackets for the power steering pump. I then did the loaner tool for the pulley. Pulled the PS and AC compressor off the car. I completely drained and then flushed with synthetic transmission fluid the Hydro boost system. It helped somewhat but I still did not have "good brakes". I ordered a new disc / disc master for a Corvette with larger reservoirs.
I also taped off the windows and put plastic up to cover the open sides of the car. I got the DA sander out and began to scuff existing paint on the entire car to prep for paint. I plan to just get color on her to get her on the street. I will do a much more thorough paint job next time after I get some seat time.
May 10
Master cylinder came in on Monday finally got time to bench bleed and install. I HAVE BRAKES! I then started the car, moved the wife's car out of the drive way and took her for a short drive down the street and back. I have to bleed the PS pump some more as I had a small amount of whine. I can't believe she is ALIVE!
I have my 3 point belts for the front I need to install and finish up the interior along with painting. The check list of items continues to shorten.
I came across a nice add for the 1972 model year.

May 21
Played in member guest tourney Thursday - Saturday. Today was slow down and get back at it day. Had to do a slight modification the upper mount brackets for 3 point retractable belts on both sides. Used Grade 8 hardware to install. I also did a test fit on the re-tractor down by the seat. Looks like it is going to fit fine. I unfortunately am going to have to pull out the seat one more time on each side to install the inner latch belt. I am going to shoot for that this upcoming long weekend.
June 2017
I haven't updated in a while. I have started to complete the interior install. I have placed windlace, rear door panels, package tray and rear seat with seat belts in. I noticed the other day my front seats are a tooth or two off on the brackets so they both are pointed out. Will have to redo them again. Uugh. I have been sanding and sanding and sanding. I have all most all the dings dents scuffs and scrapes take care of. I am still working around the sides of the rear window and where the trunk lid and quarters meet. One small spot behind the passenger rear wheel is a weird spot that I am working on. I picked up a new valance panel for under the rear bumper. My original was twisted up and dented from abuse over the years. My replacement panel from Tamraz on Ebay looked like UPS drug it all the way to my house. The funny thing is the box it was shipped in had at minimum 8" of padding all the way around. I took photo's and sanded it down and put it in primer. I will shoot the back with Rustoleum black paint.


Mechanically I have bled the brakes again and have very solid pedal feel now. I loosened the tie rod locks and moved the drivers side front wheel in from it severe toe out position. I also set the locks to not rub on sway bar, suspension bushings.
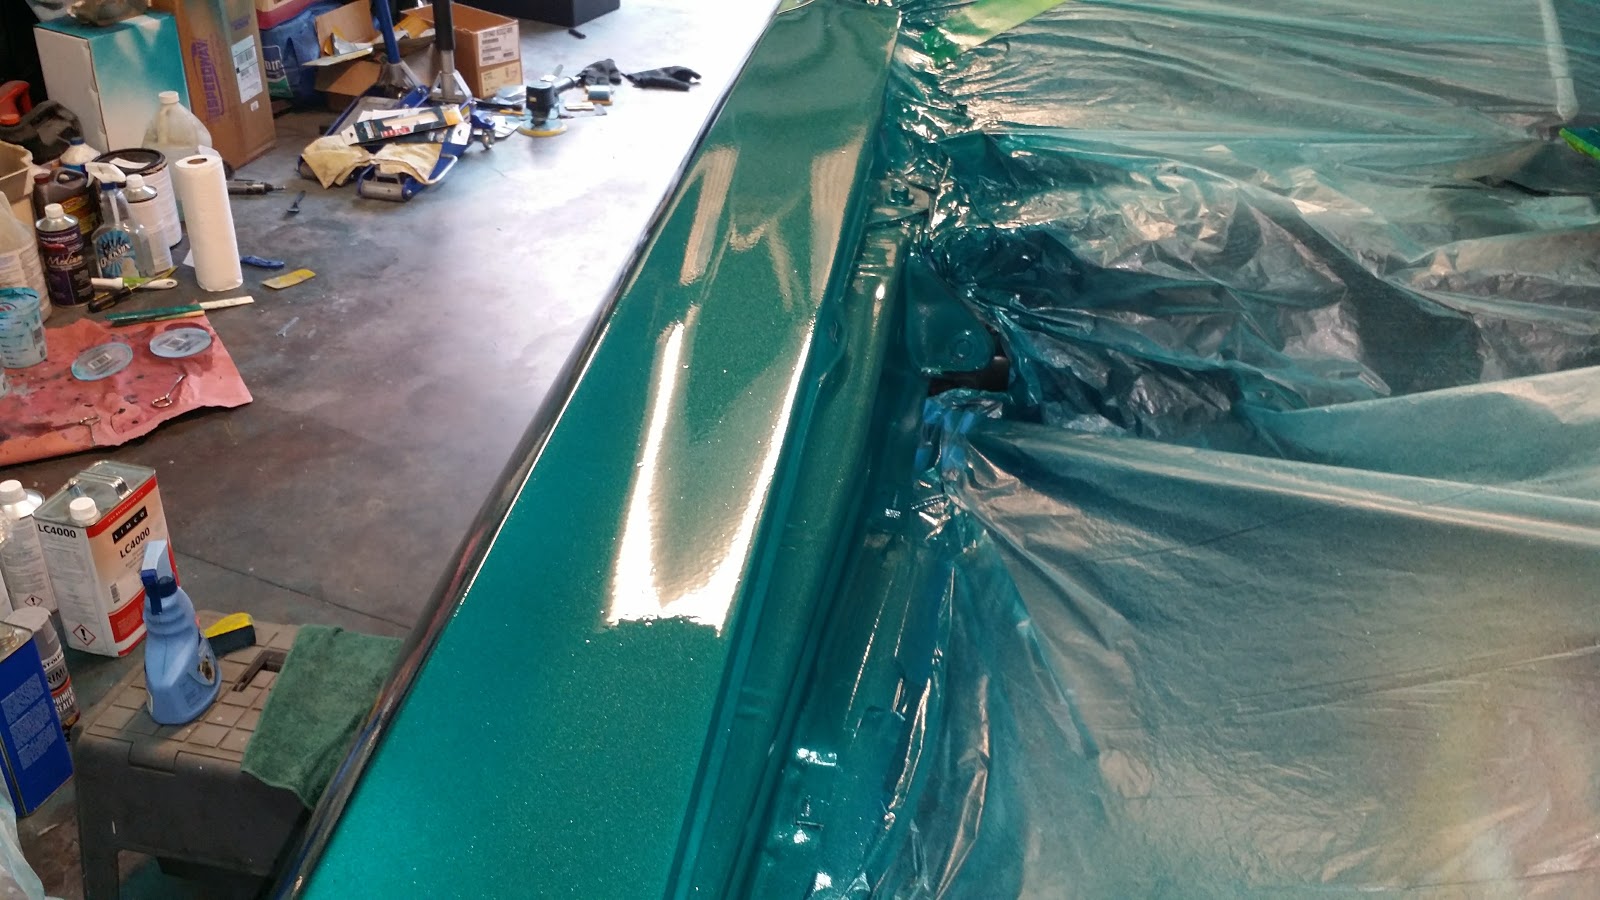
I have started putting color on the car!!! My wife picked teal metallic color and I purchased from paintforcars.com


I have painted the bottom of hood and and trunk lid and rear valance.
July 2017
I have been working on getting the rest of the car ready for paint. A little tough lately as my daughter has been playing in a lot of tournaments over the weekends. Some photos after I shot the car with primer. I reduced with the slowest reducer the local paint shop had in stock as out temps have been 94 with 80%+ humidity. Ratio was about 1:1 I just wanted a light coat to do final wet sand on. I did find about 3 issues on passenger side. One is front bottom of door and other two are around rear wheel well. I have to get the car moved across garage to check drivers side out better.


I have been using a turbine spray system and I love how easy it is versus the air compressor setup. Very little overspray no cloud of paint and easy setup and cleaning.
After taking everything out of the garage I got down to business Saturday morning.
Cut in Saturday night and rest of color all day Sunday. I needed more reducer as temps were mid 90's with a very high dew point. I was worried about tiger striping my trunk lid so I said one more coat. Wrong big mess. So paint is coming off to start it again.


No trash in paint just in clear coat as I was trying to make sure it went on wet. I had setting on gun off for most of my base coat. DUH!
pulled car out of garage.
August 2017
My daughter and I installed the front bumper. I didn't chase all the threads on the bolts so some stopped turning about 1/2 way tight. I am going to order new ones to do front and rear.

All of August I tried to paint trunk lid.
Tried to sand out but respray was terrible. Razor blade came out and removed all the paint. It came off in sheets too easy as it didn't really stick. Then to sanding the trunk lid down again to remove my mess up. I tried again to get color in a non tiger strip coverage. I was on the last color coat and paint dripped off the gun right down the center. I then sanded it down again for 3rd time. I then primer sanded and put 2 coats of color down when suddenly 1000's of love bugs showed up and kamikaze'd my paint. I removed them gave it a scuff to add color and had the paint to air ratio way off and paint was too think and bubbled up... huge mess. Got in a hurry trying to finish again. So I took the razor blade out for the second time and took all the paint off.
September 2017
Sanded smooth primed and sanded again. I then turned the fluid ratio way down and dusted a few coats to get started. Had small little strange orange peel probably due to the fact I was holding the gun about 2 1/2 feet above the lid. I let the paint flash and sprayed a couple of thicker coats that smoothed out fairly well. I then added about a 1/3 of clear in the paint cup. Sprayed a couple of coats with it. Then did 3 coats of straight clear. Overall looks much better than the rest of the car. I painted the car in 95*+ heat and finally the trunk lid was painted in the high 70's low 80's. The paint smoothed out much easier in lower temps with slowest reducer. I ended up with just 3 small spots that will sand out when I wet sand the clear.
Paint job.
Harbor Freight HVLP spray system. 89.00
Paint for Cars 150.00
Primer 100.00
Clear and reducer from Parks automotive finishes 135.00
Tape and sand paper 50.00
For the polishing I picked up from Amazon hook and loop 6" DA pad and paper. $27.00
Harbor Freight 7" polisher 35.00
Meguiars diamond cut and polish 2500 - 3000 paper Pep Boys 50.00
Been wet sanding the car to flatten the orange peel and get her shinny.
My daughter came out the help yesterday 9/12. We installed the rear bumper brackets and temporarily mounted rear bumper. She asked me how long it would take to install 2 to 3 hours. LOL! I told her about 35 to 50 minutes. I took that long looking for screws to hold the light brackets, let alone trying to find the bolts. I got a couple that worked and put it on for the look. I ordered from Rock Auto new bumper and bracket bolt kits. Should be here for Saturday install.
Got the bumper installed properly. Lights work lenses on. Time to clean up the alignment a little and drive around the neighborhood. Pics to be posted.
September 24
No video yet. Got a chance to drive the car this weekend. I still need to do some alignment work but took her the gas station. I haven't done that since 2002!
Working on installing weather stripping and door panels.
October 2017
Cleaned the contacts after checking the wires to to voltage regulator. I don't think my regulator is working correctly. I installed the weather strip channels for the windows on the underside of roof. Installed new weatherstrip. I need to adjust windows to roll up straight.
I got the courage up to take it out for real drive. I went across town to the folks house. My father didn't know I was coming over. He was installing a transmission in my brothers minivan. I pulled up and he got a big smile on his face. We discussed my paint job and the different shades of colors between panels in sunshine. Most of that is from incomplete we sanding to 3000. Some of the clear was grayish. I was going slow around corners and I need to crawl back under to verify all bolts are tight on suspension. I was told that one if the brake lights was not working... even after replacing all the lamps with new ones. My flasher is not blinking the turning signals, again a new unit. Had a guy in a mustang pull up to tell my my passenger wheel was either bent or lug nuts loose. Double checked them at the house. They were loose. Made it back home after stopping to pick up some coffee from the store and a new regulator from the parts store. The employees had to come look as I drove through the parking lot. Great Day!
I will check the fluids, change regulator, get an alignment. I need to finish the door panel install on drivers side. I need to get a few more hog rings and some more foam for the back seat. It has set for a while now and the vinyl has loosened up some. I order some new outside door handles. Once those show up I am going to pick up either butyl strip or double stick tape to hold my water shields on the doors instead of painters tape.
I have to paint my rear marker light covers. I need to touch up a couple of areas I have messed up installing things.
I haven't finished the wet sanding and polishing of the paint. All I have done the rest of October is replace the outside door handles, put a few interior items on put weather stripping on trunk, and doors. I have tried to figure out my charging issues. I put the new regulator on. Cleaned all the contacts. Checked grounds and wire conductivity. Took the new alternator to the parts store to test and they said it was good. I have a dim gen light on and battery voltage only. My next step is to pickup a 12SI internally regulated alternator and try my luck with that. I have a small exhaust leak on #6 may need to go from aluminum header gasket to a copper one. I still need to put my upgraded HEI distributor in versus my Chinesium. I am going to have to pull apart the rear end to double check my pattern I have a slight gear whine while accelerating / holding speed, coating is quiet. My trim needs to be cleaned up and installed. I need to bleed brake system again as brake light has come back on.


APRIL 2020
I have been terrible at updating the work on my car. I am now driving it on a regular basis. It functions great as a golf cart to and from the clubhouse. Let me run down the list of trouble items and what I did to correct them.
Alternator - purchased a new self regulated and when changing the connector on field wires found out I had them backwards. Works great.
I rebuilt my GM HEI with new rev limiter module and pickup cap coil and wires. Installed NGK short plugs to get around the headers. Works soooo much better. I am running a hotter spark plug due to the cooler ones fouling. I have to add octane boost to 90 non corn fuel. Worth it.
I purchased new 18" wheels and tires and got it aligned in March 2020.


I completed the brake bleeding and have all new fresh brake fluid in car. I also change the power steering pump out and bleed the hydro boost system. It works very well now.
I ran into an issue getting a replacement radiator fan clutch for my 72. The stock GM 71 BB fan did not fit the bolt holes. I ordered from Amazon (3 times to get it right) a 18" Derale 17118. This thing actually moves too much air. With the aluminum radiator it does not want to get up to temp. I can not say enough how much more air the new fan moves to improve cooling.
I painted and installed my 2015 Camaro mirrors. I am going to move from the 12" internal mirror to an 8" because overall viability is much better.
I have put some of the chrome trim on the car. I have to get replacement pieces for damaged ones on there now.

I have installed a Retro sound radio with AUX input. I have to order the Bluetooth adapter so I can use my phone through the radio.
Installed my headliner and then ran into a big issue with dome light wire harness. The connector broke.
So I modified the end of the harness to work the dome light.


Issues still to be addressed. I have 3:07 gears to swap out the 3:73 for better cruising. I completely blow the tires loose with anything more than 1/3 throttle.
It is amazing the rapid wind up the roller cam has.
I need to finish wet sanding / buffing the paint to flatten it out.
I have to fix an issue on drivers door.
I need to install more trim clips on rear window surround.
I have to adjust the side windows to roll up correctly.
AC and radio WOW! With the windows up it rides very nice.
February 2023
Not happy with the 3310 and idle quality. So I picked up a Holley 870VS carb to get more air. Worked on timing, idle and choke. Just trying to get the car to start reasonably. Plugs fouling so rich issue and working trying to resolve. I have been trying to dial in the choke.
August 2023
EFI!
Ok, so I took advantage of a super sale on the Royal Flush TBI kit from Aces.com fuel injection for my birthday. TBI, ECU, coil and distributor to control timing. So the tear down begins.
I started with a decent find on a set of 290 closed chamber BBC heads locally.

The 702 head I have on the engine need the intake face resurfaced as the angle is off and I believe it is causing issues. Got a great deal on clean take off loaded heads with stock valve size and CC 930-16 springs. So I wont have to tear these apart to swap out springs. I plan to take the 702 heads to a local shop the fix the angle and reinstall later. They are pocket ported with larger valves for better flow. I picked up a Victor Jr intake from same seller for cheap as well.

WIN!
So started with removing hood with the help of my nephew and daughter. Tore off the top of the engine in prep to install 290 heads. Also started to remove some of the un-need wires coming through the firewall.
I also drilled out the factory hole at the bottom right side of firewall to run the EFI controller wire through. While I am at it will go through the dash wiring to clean up some previously "good enough to drive"
I got a smoking deal for an EFI fuel tank. I got a Spectra Premium GM34EFI tank and pump combo for $110 plus $20 freight. This tank isn't the one I wanted as I plan to use the ECC system to try to keep the fuel smell wife friendly. I ordered from Amazon 2 sets of stainless steel bulkhead hose fittings. I then installed in the tank. The pump and sender opening it much larger than stock so I was able with care using a wire install the fittings. Clean the minor amount of shavings in tank. I had read on car forums about issues with the stock pump so I ordered a Walbro GCA-758-2. from Summit It was a plug and play install.


The photo above shows the well where the pump pickup and return sit. I didn't take measurements but it looks like it should hold fuel on the sock well.


Using wire to pull bulkhead connectors through the holes I drilled.


After I snapped these photos I used fuel resistant sealant on the threads and holes to seal the ECC vent tubes to the tank.
September 2023
Ordered a carbide tipped hole saw to drill into the header collector to weld in O2 Bung. I then repainted with VHT aluminum header paint.
Decided while I was at it to tear the rear end apart to swap from 3:73 to 3:07. I am not going to race the car and want to drive it more with the EFI. The 3:73 is a fun gear but anything more than 1/3 to 1/2 throttle on the street it gets sideways. So while the car is up in the air thought it would be good time. Now the third member is also in pieces.
Played in an individual golf tournament at the end of the month.
October 2023
Was playing in a member guest tournament so not much happening on the car. Worked on new built in cabinets for dinning room for my wife. When those are finished it will be to the studs in the kitchen. Going to have to fight for time to keep going on the car.
December 2023
Not a lot of work going on the car as it is work on the house, too much work at work and family time.
I was getting ready to order new 2-1/2" tail pipes to replace the old ones from the 90's that were bent by a local shop and weren't routed great. Jeg's had a killer sale for 409SS complete exhaust kit for less than flow master tail pipes. Picked up a couple of new turbo mufflers to complete the kit for less than $300.

This is starting to turn into just one more thing while I am at it again. Maybe a 4L80E swap might not be a bad idea at this stage. Hmmm..
January 2024
The kitchen renovation has started. I installed an LVL beam in the attic. It is overkill for what I am doing to just move a load bearing wall. The good reason is that the roof is supported properly in anticipation of the construction of the new wall. If a future owner of this house wants to knock down the uppers and create a large island they are only going to have a single column required to support the roof over two rooms.
It is looking like January and February is going to be tough to get time in the garage.


March 2024
So to the subfloor and studs and back again. Started first full week of February and ordered counter tops first full week of March. 2 weeks for install. Sanding down the wood floor to refinish so all the wood in the kitchen and dining room match. Seeing the light at the end of the tunnel. Looks like April is the month to start to get everything working towards getting it back going again.
August 2024


So a local automotive enthusiast had a Baer 13" front brake kit listed on marketplace. I was watching for quite some time. I finally decided to pull the trigger. While picking up the brake kit was overlooking his projects. Had a couple of Firebirds and a 55 he was completely rebuilding from track to street use. He ended up being a childhood friend of my neighbor. Had to pick up some new grade 8 hardware to mount. This time it is taking too long because final trim work in the kitchen is dragging on.

Almost done with the under hood wiring upgrades and will be completing the final mounting of ECU on top of the glove box. Completed the install of PTFE 6AN hose from 3/8 fuel line from rear of car to TBI unit. Had to pickup a temperature adapter to move the thermostat up for EFI unit. Didn't think about removing a head plug before installing the heads on the engine. DUH!
April 2025
Ok, so been back in the garage while I had permission from my lovely wife. Got the rear end dialed in as best as I can with the used gear set I picked up off of Chevelles.com. Changing the studs out on the rear axels. These are about 1/2" longer than the stock Summit Racing ones. They just didn't feel like I had enough meat in the lug nuts. Then I need to swing by the parts store to pick up new gear oil and some Posi additive. Been trying to fit all my projects into a day/week/month. I have to mount the EFI tank finish the rear plumbing and clean up the wiring for the dash. Then I will need to upgrade the stereo system. Parts in hand just need time. I also installed a headlight relay kit. Pretty straight forward and fit so that it doesn't stick out.
May 2025
Took vacation time 2nd through the 6th to push on and get her finished up. Finished torque checks on the rear end. Added grease to the axel bearings and installed longer standard 7/16 lug bolts. Put the new LPW rear end cover on.


Then worked on installing the new EFI tank. Hooked up the hoses for ECC and fuel send and return. The Continental Barricade hoses are stout and required some force to get on the barbs. Forgot to double check the 6AN fitting on the Corvette regulator return. That leak shows up later after priming the pump. Put the upper radiator hose, water neck and sensors in. Double checked my wiring for the new headlight relays.

Hooked up the tach feed wire to my in dash tach. Hooked up the AC compressor on wire to the EFI controller.
Then moment of truth. Primed the pump a few time and tired to start the car. It didn't kick over right away. I then checked all my fuel connections at the engine back to the fuel tank. That is when I found I had finger tightened the return 6AN fitting. Tightened it up and back to starting the car. Primed the pump a couple more times and tried to crank it over.
It STARTED!
The problem is it bucked and snorted and blew back through the TBI. Ooops have a plug wire or 2 out of order. Went up front and started with 1 and worked my way around and found I had a couple out of order. Put them in the correct position and she fired right up. I then went to check for leaks. I found plenty. My factory temp sender in the intake was loose, upper radiator hose that has been on the car since I bought it back in '87, water neck gasket, driver side of the water pump and finally the worst offender the tube nut on the oil pressure line above the oil filter. It was spraying oil onto the header.
So after it cooled down I started with tightening the oil sender tube nut, finger tight is cutting it.
Ordered new FELPRO gaskets for water neck and water pump. New upper radiator hose. I then started to unbolt items up front to get access to the water pump. I found that the bolts on the passenger side were snug but the drivers side needed to be torqued quite a bit. I am going to forgo pulling the pump and try just torqueing to good-n-tight.
I did find that the EFI temp sensor tip was butting up against the thermostat. I then was in a dilemma. Do I do away with the factory warning light sender and place the EFI sender in the intake? I happen to find a 3/8 NPT male/female adapter in a gauge parts box. So the tip of the sensor is just at the edge of the water neck adapter so fixed that one. My gas gauge was showing way past full. I double check the Spectra connector at fuel pump good. They chased the factory brown wire and found out I was disconnected behind the bump at the factory connection. Now it works great.
Whew!
In the mean time I noticed my EFI software is way out of date. So I downloaded files to update the handheld unit and ECU. Took me a minute to figure out what the system wanted on the USB drive to get it to recognize the software. Once that was done it was updated in a few minutes with no errors.
Saturday the new upper hose arrives and I get it installed.
So Saturday 5/10 I turn the engine over again. It started struggled a moment and shut off. I start again and she is thumping right along.
I have my car backed into the garage so I have a couple of work fans in the back blowing forward to try and keep the obnoxious fumes down. (Lady of the house is no fan of car smells. :) ) The VHT header paint is warming up and gassing off a bunch which is eye watering. Engine just keeps thumping along. One thing I did notice is the injector popping is loud and the air is screeching through the IAC. Louder than what I was expecting. Need to start watching instructional videos on how to adjust the idle correctly. I have done some research and the blades are not open enough and IAC valve is proving all the air at idle. You can't hear it in the car just upfront by the engine.
Now I have to bleed the brakes and power steering and put the hood back on.
Friday 16th I took the front wheels off the car and bled the front brakes. Went pretty easy and used an adjustable pole along to hold brake pedal down while I opened the bleeder screws. Wife came out to check on the progress and was excited to know she didn't have to pump the brakes. I did some back and forth with the steering wheel to try and move air out of the steering.
Saturday 17th started by installing the rear tank strap bolts I ordered from Inline Tube. Tightened the parking brake cable or so I thought. I removed the jack stands under the front suspension and lowered the car down. Tightened all the lug nuts again. Checked the radiator, good. Checked the oil, good and checked the transmission fluid and dipstick was dry. I ran to the auto parts store and picked up a jug. Added about 3 quarts. I then took off the car cover off and pulled the car into the driveway. I did some IAC adjustments and thought the idle was decent. Drove down the street and the power steering / hydro boost was letting me know I have air in the system. I was going about 15 to 20 MPH and heard what sounded like a wrench falling. Turns out I didn't have my parking brake cable tight and my hook from the crossmember fell off. I stopped and picked it up. As I was headed back to the house in the neighborhood the idle quality changed and it was lugging about 450 RPMS. I pulled in the driveway and loaded up the ACES video on IAC adjustment. I reset the TPS after adjusting it several times. The idle was very smooth. No longer did I get the lope throwing the car side to side. The exhaust out back was still hitting just really smooth. I then had my wife and daughter help me install my hood. I still have the painters tape on my fender edges and hood. I will take that all off after I get done adjusting the hood. The new cowl seal is really tall and will need to settle. Now the hydro boost pretty much is quiet and stops very quickly but the power steering needs some alone time. I will get to that. I took my car out onto the big road for a shake down run. She is an on off switch now. Still breaks the tires loose easily with the 3:07 gearing. BTW they are dead quiet so my triple and quadruple checking must be right. I did a blast up to about 60 MPH and she was good. I did a hard brake and it was good. She was running about 185 - 190* without the AC on ambient was in the low 90* range. I drove for about 20 minutes and other than the squalling from the steering she is good. I drove back by the house waiving to my wife and daughter and they said that my smile was ear to ear! Cleaned up the side of the garage my car had previously sat. Pulled in and shut it down.

Current to do list: Bleed steering more. Install power and speaker wires to trunk for audio install. Plan is 3.5" in dash crossed over for tweeter, 6.5" crossed over for mid and highs in front lower kick panels, rear side panels 6" mid and highs, 6x9 full range in rear deck and 10" sub in trunk for lows. I am not looking to bump the neighborhood just want nice full range sound. Check lug nut torque again. Finish repairing cracks in dash pad. Sand a couple of paint issues and shoot a little color on them. Adjust the drivers side headlight bucket. I will probably end up with a new front bumper. I spilled something on it and it now has some rust spots. Adjust driver and passenger windows to close properly.
My next big issue to address is the leaking of my transmission. I am wondering if the torque converter seal is shot. Not sure it is making contact with the stator. I am either going to replace the seal.

So my O2 sensor took a crap. Picked up a Bosch 17025 from O'Reilly's and a HBX-1 bung adapter to move the O2 sensor out of the direct flow. Looks like it got all full of soot. I also picked up a catch can to help with any oil blow by going on. I am thinking that the rings are stuck from sitting or they have failed do to being abused. I picked up a compression tester so I will run a quick cylinder check to see where my compression is. Depending on what I come up with I might have to do a mad re-ring over a weekend or go crazy and take a weeks vacation to Roadkill Garage brake hone rebuild of the engine.
August 2025
Daily driving the car to work especially on Fridays.

September 2025
With the rear gear ratio swap to 3:07 I was looking to swap the converter to 2800 to 3000 stall. Not sure if it was needed. I was thinking I had leaking issues with seal and stator size on my 2500 converter. So with the help of my brother we jacked the car up to the sky and pulled the transmission out. I appears that the factory dipstick tube was the culprit for puking out large amounts of trans fluid. I ordered a Lokar flexible tube. I can feel the drag of the O-rings in the hole. I am going to clean the case up really well and run a bead of sealer around the top as well. The converter seal seem to make contact with the stator. It may have been a small issue. I installed a new seal. Then installed the new FTI converter. We then moved the transmission back under the car, lifted it up and lowered the car down around the transmission. Got it bolted in and I then cleaned up. I have to replace the shifter cable as the current one is difficult to move in and out of gear. I am replacing the pan gasket with one that has a metal shim in it. Again all in an attempt to fix the leaking.
March 2026
Found an as new stereo dash pad on marketplace. Picked it up.
Ok I could not take it any longer. The blowby issue got me. So I ordered new rings, bearings gaskets. I purchased a hoist and got an engine mounting plate for my engine stand. Picked up 10 cans of brake clean, got my purple degreaser and dawn dish soap ready.
So Friday March 6 I stared unbolting and unhooking everything under the hood. Pulled the engine and started disassembly and clean up.
So I ordered Speed Pro E-233K rings, Mr. Gasket 1131G shim gaskets, Summit 1 piece oil pan, Fel-pro cam change kit and Fel-pro valve cover gaskets. I picked up Holly Track Series 241-281 black fabricated valve covers, Summit 1.7 stainless roller rockers to replace my older Lunati aluminum ones.
Completely stripped the block and then cleaned up casting flash in the lifter valley. Drilled 2 1/2" holes for parallel cooling. On the block surface and head surface I used 10" 400 grit diamond hone block to smooth and clean the surfaces. They cleaned up nice and using a straight edge they stuck on my smallest feeler gauge. Should be good enough for the girls I run with. I then knocked out the casting plugs. Got out the 1/2 gallon of dawn and went to town with scrub brushes and wire engine brushes cleaning it up. I had already had my 702 heads intake face milled at my local machine shop. So I dawned them a couple of times to make sure they were clean as well. When I disassembled I bagged each valve and springs for each cylinder to match the initial setup years ago. I got new vitron valve stem seals and installed. Lapped the valves to make sure the seats were clean and installed springs. I did pick up some new stainless headers to replace my old beat and rusty ones. They will match up with my new Jeg's stainless 2.5" exhaust. I picked up a new Hayden 2747 HD fan clutch while I was spending my wife's retirement money. Thanks Hon!
April 2026
After taking time away from my wife's honey do list. I finally booked a nice weekend to get my engine back in the car.
Facebook Market place for the win. Got a deal on a 1972 stereo dash pad. Looks practically brand new. I will swap that in after I am done with the engine.
May 2026
Friday night after work I installed spark plugs, wires and filled radiator with distilled water.
Monday May 11th hooked up my O2 sensor and then had to phase my distributor 180* as I had it installed wrong. After getting it close to 15* per Aces specs. I then re-tightened all the fuel line AN connectors at the TBI unit as I sprayed gas everywhere the day before testing them. So now that it was all dry I turned the key over and she fired right up. I quickly found out I spilled oil on the passenger header in my reassembly and had quite the smoke show. I tried to verify my timing was close. It looked like it. Let her run for a few minutes and shut it off. Now to take off the valve covers and headers to re-torque the head bolts.
So found another deal way to good to pass up. Jeg's had a deal on a 2 row 1-1/8 tube Aluminum factory stamped radiator. I have a 1 row factory style plastic tank model and for $250 I didn't think I could pass that up.
FEDEX is not my friend. They absolutely did a number on my shipment.
And on top of having to round the inlet and outlet, the core itself was slightly twisted. A few minutes with some pliers and the aluminum tubing was rounded into a workable shape. I little gentle twisting and it appears to be fairly straight or good enough for the girls I run with. I will swap this in when I can physically get back after it again. Hopefully this weeks chiro visit fixes me again.
1 step forward 2 steps back. While I was rebuilding the engine I ordered a rebuild kit for my Melling M77. I apparently installed the pressure spring backwards. After starting her up I had ZERO oil pressure. Checked copper tube to make sure it wasn't pinched. Shut it down and ordered from Summit a Moroso 22195 stock depth replacement oil pump. Had my brother come help due to the pinched nerve in my back and little strength or mobility. Removed shroud, fan, valve covers, spark plugs, starter, distributor and finally motor mount bolts. I zip tied up the exhaust pipes and got the engine hoist out to lift up the motor until the transmission hit the tunnel. I drained the oil, removed the filter which was full of oil and unbolted the pan. Then when the pan was loose and could see where the fly weights were on the crank I rotated for a little more room. My brother unbolted the pump and I held the oil pan off to one side and removed the Melling. I brake cleaned the new pump and poured oil in it. Spun it a few time to feel the oil grab the gears. I then reinstalled the intermediate shaft and got the new pump installed. On first try the shaft and pump didn't seat correctly so I loosened the retaining bolt and used a long screwdriver to spin the shaft. We got a confirming click to let us know it sat down in the notch and I then tightened the pump up. Bolted up the oil pan and set the motor back down on mounts and we installed the motor mount bolts. Unhooked the hoist and put it away. I did the unthinkable and piled up the tools instead of putting them away. I then went and iced my back the rest of the day.
The next important step now is the locate my priming shaft to verify that I have oil pressure before getting carried away.
June 2026
Well could not locate my priming tool, quick order from Amazon and 2 days later had it in my hand. Great news oil pressure on gauge and oil pushing up through push rods.
Hooked everything back up and tried to guess timing. Got it a lot advanced got the engine started. I was trying to adjust the timing down to 15 degrees advanced. Then saw power steering fluid pouring out of the lower radiator cooler connection. Shut it off. Will do 6AN conversion on ends of steel tubing to try and seal the cooler.
Got the hood reinstalled. Now I need to bleed the brakes after swapping distribution block.
This is a great timeline of events. Thank you for sharing!
ReplyDeleteFaded67 (Chevelle Tech forums)
Hi Deon, Just found your website from chevelle forum... I must say I have enjoyed reading, and your picture post of your chevelle... Great work my friend, like seeing it come back to life... I too am doing an off the frame on a original 70 396, slow, but one day it will go... Will be monitoring your site for updates, and pics... Thank you for sharing, Gus
ReplyDelete